

Game Control: SweetFX Shader Suite
Page 1 of 1

 Game Control: SweetFX Shader Suite
![]() AKMARK5000 Mon Apr 15, 2013 10:38 pm
AKMARK5000 Mon Apr 15, 2013 10:38 pm
UPDATED 2016 !!
In non-technical terms, SweetFX is meant to allow customizable graphical improvements to all sorts of games. Applying SweetFX files changes the look, feel, and overall mood. SweetFX becomes a savior to many games where graphical options are limited or not even present.
Having used SweetFX for about five years, I've been able to make almost all my games look more vibrant and crisp. Personally, I like to apply SweetFX to 99% of the games that I play. A list of games that I have used SweetFX to can be found in my STEAM Profile and a more complete and updated listing at my Pastebin website account.
==> http://steamcommunity.com/id/akmark5000/games/?tab=allmy
==> http://pastebin.com/tLadd3kJ
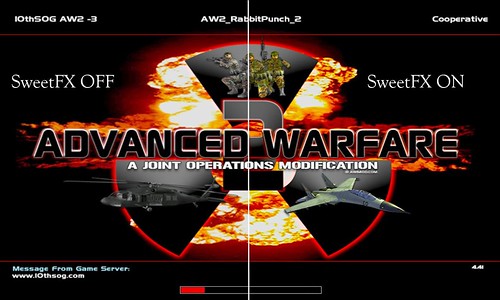
Here is an in-game screenshot example of the effect SweetFX has on the Joint Ops AW2 4.41 game.
Keep in mind that my Gamma setting is set as high as it can go. The reason is that some game missions are too dark for my eyes. A maxed out gamma brightens, but also washes out the colors.
First, before using or installing SweetFX (applies to any game):
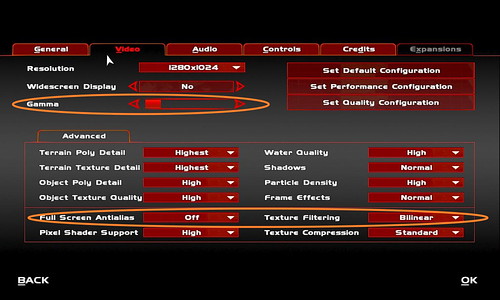
Start the game normally and edit the video or graphic settings. Your settings might look different depending on what works for your computer.
Turning the GAMMA to HIGH lightens up dark and difficult to see maps. If available, turn off any other injectors or filtering such as FXAA, MSAA, InjectFXAA, InjectSMAA or FXAAtool, etc. Other settings to disable are Anti-aliasing and Vsync.
Here is a screenshot of my Joint Ops AW2 settings.
Option I. If you want to apply SweetFX to more than one game or want to experiment and customize the settings the easiest way to accomplish this is to use the SweetFX Configurator. This program automates the entire process as much as possible (details are in a separate section of this post).
Option II. If you just want to apply SweetFX to one game such as the AW2 Mod, then just download my ready-made version of SweetFX 5.1.1 Note that this is not the SweetFX Configurator program in Option I.
Sweet FX 5.1.1 (Vibrance99) ==> http://ul.to/9qumtto7
Download it to your desktop and extract all the contents to your game folder (where ever the game's .exe is located). Please understand, depending upon how you installed the AW2 mod, the location of the game's .exe differs!
The Configurator Program and Presets Explained:
Previously, I mentioned two different methods to apply SweetFX, but this article is focusing in on using SweetFX with the Configurator.
The first thing is to realize that SweetFX and Configurator are two separate programs. Think of it like this; the Configurator is just a launcher program that you use to modify and change the settings of the SweetFX program files. Also, keep in mind that SweetFX versions (1.3, 1.4, 1.5) will all work with the Configurator.
Whatever game or mod you want to use, there are some in-game preparations involved. Start your game and edit some of the graphic settings. Turning the GAMMA up will lighten dark and difficult to see maps. If available, turn off any other injectors or filtering such as FXAA, MSAA, InjectFXAA, InjectSMAA or FXAAtool, etc. Other settings to include Antialiasing and Vsync.

Click Image To Enlarge
If you want to apply SweetFX to more than one game or want to experiment and customize the settings the easiest way to accomplish this is to use the SweetFX Configurator. This program automates the entire process as much as possible. This updated version includes the SweetFX 1.5.1 files.
For your convenience, I have decided to host my customized version. This version is customized because I have included some different ‘presets’ and already made some setting changes… not modifications to the program itself; I’m not a brilliant programmer like the author CeeJay.dk.
My Customized SweetFX + Preset Download ==> http://ul.to/vsvh4omf
CeeJay’s SweetFX Website ==> http://forums.guru3d.com/showthread.php?t=381912
(Generic downloads, news, discussions, and information details)
Instructions:
- Download the SweetFX Configurator 11132013 Zip archive to your desktop.
- Extract the contents (SweetFX Configurator folder).
- Close and delete the downloaded Zip archive.
- Open up the newly extracted SweetFX Configurator folder
- Find the executable file (SweetFX_config.exe).
- Right,-click and choose “run as administrator.”
The main program window opens. It is blank, so let’s add a game (Aces War Thunder) and change a couple settings.
On the left-side, there’s the Game List, which has nothing in it. Click on the Add New Game button. Navigate to where your game folder is located.
Note that we are looking for the game’s executable file (.exe). In this case, there is ‘launcher.exe’ and ‘aces.exe.’ The actual game is started by ‘aces.exe.’ I found this out through trial and error.
Anyway, double click on the game executable file (.exe). This action puts the .exe in the Game List. Click on the name and it briefly flashes blue.
The game activates and is now ready to have SweetFX installed. Click the Add SweetFX button on the right-side. The middle now has a bunch of settings. You can turn each setting on/off via the checkbox beside the setting’s description. Some are already checked. They are active, so, don’t turn them off… at least for now. Underneath is where you can choose sub settings and change the values (numbers).
Scroll the various settings and click on the Vibrancy setting. Change 0.15 to 0.99 (more vibrancy, more bright color). Scroll through again and click on the check box for Split-Screen. The value for the split screen is one by default, which is one way of demonstrating what your game screen looks like with SweetFX ON/OFF.
In the bottom center, click on the Save Configuration button and the checkbox that says “automatically save configuration.” Now, you’re ready to close the Configurator via the red-x in the upper right corner and then start your game as you normally do.
Once your game starts you’ll notice a more vibrant brightness in the screen’s right side and the screen’s left-side will probably be somewhat dull. Not only did you increase the Vibrancy, but you activated the Split-Screen setting with the 1 value (vertical 50/50, SweetFX ON for the right-side and SweetFX OFF for the left-side).
Go back through and deactivate the Split-Screen setting… don’t forget to click on the Save Configuration button! This time, when in your game, you can use the END keyboard key to toggle SweetFX ON/OFF to compare the effects.
Presets (AW2 Mod):
In my customized version, I included some ‘presets.’ Presets are simply ready-made text files that store settings information. This file determines which settings to apply and not to apply.
Open the SweetFX Configurator folder and open another folder called SweetFX. Inside that is yet another SweetFX folder to open. Inside that you finally see a folder called Presets. Inside the Presets folder are some text (.txt) files labeled with various game titles… these are the actual ‘presets.’
Now that you know what presets are and where they are located, let’s go ahead and apply one.
- As before, open up the SweetFX Configurator folder.
- Find the executable file (SweetFX_config.exe).
- Right click and choose “run as administrator.”
The main program window opens. It is blank or has one game listed (aces.exe). Well, let’s add another game. This time, let’s apply SweetFX to the Advanced Warefare II Mod.
On the left-side, there’s the Game List, which has one game listed (aces.exe). Click on the Add New Game button. Navigate to where your Advanced Warfare II game folder is located. We are looking for the game’s executable file (JointOps.exe).
Note that the JointOps.exe location will depend upon how you installed the AW2 Mod. It might be inside the Advanced Warfare II folder or the Joint Operations Typhoon Rising folder or another related folder.
Anyway, click on the game executable file (.exe) and then click the Open button. This puts the .exe into the Game List. Click on the name and it briefly flashes blue. The game activates and is now ready to have SweetFX installed. Click the Add SweetFX button on the right-side. The middle now has a bunch of settings… ignore them.
Click the Load/Save Configuration button located on the right-side. A Presets window appears. Over near the left-side-bottom is a button called Import Presets… click it.
A search window opens. It should be opened to your game folder location (the one where JointOps.exe resides). Look for and open a folder titled SweetFX. Inside you will see the various presets available. Click on the one titled AdvancedWarfare2_99Viberant_M5 and then click the Open button.
AdvancedWarfare2_99Viberant_M5 appears on the Presets window. Now close the Presets window via the red-x in the upper right-side. The Configurator window reappears and you have to click the Load/Save Configuration button located on the right-side again… why the repeat action? -- it’s a bug or some sort.
So, once again, the Presets window appears, but previously, the center area was blank. This time, it has some setting text. Click the Load Preset button and close the Presets window via the red-x in the upper right-side.
The Configurator window fully appears. In the bottom center, click on the Save Configuration button and the checkbox that says “automatically save configuration.” Now, you’re ready to close the Configurator window via the red-x in the upper right corner and then start your game as you normally do.
Presets (LOTRO):
In my customized version, I included some ‘presets.’ Presets are simply text ready files that store settings information. This file determines which settings to apply and not to apply.
Open the SweetFX Configurator folder and open another folder called SweetFX. Inside that is yet another SweetFX folder to open. Inside that you finally see a folder called Presets. Inside the Presets folder are some text (.txt) files labeled with various game titles… these are the actual ‘presets.’
Now that you know what presets are and where they are located, let’s go ahead and apply one.
- As before, open up the SweetFX Configurator folder.
- Find the executable file (SweetFX_config.exe).
- Right click and choose “run as administrator.”
The main program window opens. It is blank or has one game listed. Well, let’s add another game. This time, let’s apply SweetFX to the Lord of the Rings Online (LOTRO).
On the left-side, there’s the Game List, which has one game listed (aces.exe). Click on the Add New Game button. Navigate to where your LOTRO game folder is located. We are looking for the game’s executable file (lotroclient.exe).
Note that the lotro.exe location will depend upon how you installed the game. My lotroclient.exe is located in C:\Program Files (x86)\Steam\SteamApps\common\Lord of the Rings Online…
Anyway, click on the game executable file (.exe) and then click the Open button. This puts the .exe into the Game List. Click on the name and it briefly flashes blue. The game activates and is now ready to have SweetFX installed. Click the Add SweetFX button on the right-side. The middle now has a bunch of settings… ignore them.
Click the Load/Save Configuration button located on the right-side. A Presets window appears. Over near the left-side-bottom is a button called Import Presets… click it.
A search window opens. It should be opened to your game folder location (the one where JointOps.exe resides). Look for and open a folder titled SweetFX. Inside you will see the various presets available. Click on the one titled LordOfTheRings_LOTRO_M5 and then click the Open button.
LordOfTheRings_LOTRO_M5 appears in the Presets window. Now close the Presets window via the red-x in the upper right-side. The Configurator window reappears and you have to click the Load/Save Configuration button located on the right-side again… why the repeat action? -- it’s a bug or some sort.
So, once again, the Presets window appears, but previously, the center area was blank. This time, it has some setting text. Click the Load Preset button and close the Presets window via the red-x in the upper right-side.
The Configurator window fully appears. In the bottom center, click on the Save Configuration button and the checkbox that says “automatically save configuration.” Now, you’re ready to close the Configurator window via the red-x in the upper right corner and then start your game as you normally do.
Obtaining and Applying New Presets:
Lately, I have been getting presets from the SweetFX Presets Database. There's a huge selection of games that have presets already created by very talented community members. I also get a lot of SweetFX information from a STEAM group called "SweetFX Junkies."
==> http://sfx.thelazy.net/games/
==> http://steamcommunity.com/groups/SweetFX
I had applied SweetFX 1.3, 1,4 and 1.5 to various games before SweetFX 1.5.1 existed. Now, I want to update a few games and one of them is Far Cry III.
At this point it is important to remember that whatever version of SweetFX (1.3, 1.4, 1.5, or
'Next'), they will all work with the current Configurator with the 1.5.1 files?" Well, here's why.
When I downloaded the preset and the version is "Next," which is most likely a new name for
SweetFX 1.5.1.
Download the preset for the game and just extract the "SweetFX_settings.txt" text file to the desktop and rename "SweetFX_settings.txt" to something meaningful. I renamed mine to "FarCry3_(VibrantFixed)_GSN_Omnipotus.txt."
Move "FarCry3_(VibrantFixed)_GSN_Omnipotus.txt" into the Presets folder... Open the SweetFX Configurator folder and open another folder called SweetFX. Inside that is yet another SweetFX folder to open. Inside that you finally see a folder called Presets.
Since the game previously had SweetFX applied and installed, it's a good idea to remove sweetFX, delete any SweetFX files from the game's folder and then reapply via the Configurator, which contains the new files.
Now that the new preset is in the correct location, it's time to apply it to the game.
- As before, open up the SweetFX Configurator folder.
- Find the executable file (SweetFX_config.exe).
- Right click and choose “run as administrator.”
The main program window opens. On the left-side, there’s the Game List. Select the game by clicking on the name. It briefly flashes blue.
Over on the right-side, click the Remove SweetFX button. The middle, where there were a bunch of settings, is now blank.
Go to the game's folder and if necessary, another folder that contains the game.exe. The game that I am using is an example... C:\Program Files (x86)\Steam\SteamApps\common\Far Cry 3\bin. Inside that folder find and delete the following:
SweetFX (a folder)
injector.ini
SweetFX.settings.txt
SweetFX.settingf.orig
Ready to reapply SweetFX via the Configurator? Follow the directions earlier in this article for applying SweetFX presets.
More Examples (Videos) ==> https://www.youtube.com/user/akmark5000/
In non-technical terms, SweetFX is meant to allow customizable graphical improvements to all sorts of games. Applying SweetFX files changes the look, feel, and overall mood. SweetFX becomes a savior to many games where graphical options are limited or not even present.
Having used SweetFX for about five years, I've been able to make almost all my games look more vibrant and crisp. Personally, I like to apply SweetFX to 99% of the games that I play. A list of games that I have used SweetFX to can be found in my STEAM Profile and a more complete and updated listing at my Pastebin website account.
==> http://steamcommunity.com/id/akmark5000/games/?tab=allmy
==> http://pastebin.com/tLadd3kJ
Here is an in-game screenshot example of the effect SweetFX has on the Joint Ops AW2 4.41 game.
Click Image To Enlarge
Click Image To Enlarge
Click Image To Enlarge
Keep in mind that my Gamma setting is set as high as it can go. The reason is that some game missions are too dark for my eyes. A maxed out gamma brightens, but also washes out the colors.
Click Image To Enlarge
Click Image To Enlarge
Click Image To Enlarge
First, before using or installing SweetFX (applies to any game):
Start the game normally and edit the video or graphic settings. Your settings might look different depending on what works for your computer.
Turning the GAMMA to HIGH lightens up dark and difficult to see maps. If available, turn off any other injectors or filtering such as FXAA, MSAA, InjectFXAA, InjectSMAA or FXAAtool, etc. Other settings to disable are Anti-aliasing and Vsync.
Here is a screenshot of my Joint Ops AW2 settings.
Click Image To Enlarge
Click Image To Enlarge
Click Image To Enlarge
Option I. If you want to apply SweetFX to more than one game or want to experiment and customize the settings the easiest way to accomplish this is to use the SweetFX Configurator. This program automates the entire process as much as possible (details are in a separate section of this post).
Option II. If you just want to apply SweetFX to one game such as the AW2 Mod, then just download my ready-made version of SweetFX 5.1.1 Note that this is not the SweetFX Configurator program in Option I.
Sweet FX 5.1.1 (Vibrance99) ==> http://ul.to/9qumtto7
Download it to your desktop and extract all the contents to your game folder (where ever the game's .exe is located). Please understand, depending upon how you installed the AW2 mod, the location of the game's .exe differs!
The Configurator Program and Presets Explained:
Previously, I mentioned two different methods to apply SweetFX, but this article is focusing in on using SweetFX with the Configurator.
The first thing is to realize that SweetFX and Configurator are two separate programs. Think of it like this; the Configurator is just a launcher program that you use to modify and change the settings of the SweetFX program files. Also, keep in mind that SweetFX versions (1.3, 1.4, 1.5) will all work with the Configurator.
Whatever game or mod you want to use, there are some in-game preparations involved. Start your game and edit some of the graphic settings. Turning the GAMMA up will lighten dark and difficult to see maps. If available, turn off any other injectors or filtering such as FXAA, MSAA, InjectFXAA, InjectSMAA or FXAAtool, etc. Other settings to include Antialiasing and Vsync.
Click Image To Enlarge
If you want to apply SweetFX to more than one game or want to experiment and customize the settings the easiest way to accomplish this is to use the SweetFX Configurator. This program automates the entire process as much as possible. This updated version includes the SweetFX 1.5.1 files.
For your convenience, I have decided to host my customized version. This version is customized because I have included some different ‘presets’ and already made some setting changes… not modifications to the program itself; I’m not a brilliant programmer like the author CeeJay.dk.
My Customized SweetFX + Preset Download ==> http://ul.to/vsvh4omf
CeeJay’s SweetFX Website ==> http://forums.guru3d.com/showthread.php?t=381912
(Generic downloads, news, discussions, and information details)
Instructions:
- Download the SweetFX Configurator 11132013 Zip archive to your desktop.
- Extract the contents (SweetFX Configurator folder).
- Close and delete the downloaded Zip archive.
- Open up the newly extracted SweetFX Configurator folder
- Find the executable file (SweetFX_config.exe).
- Right,-click and choose “run as administrator.”
The main program window opens. It is blank, so let’s add a game (Aces War Thunder) and change a couple settings.
Click Image To Enlarge
Click Image To Enlarge
Click Image To Enlarge
On the left-side, there’s the Game List, which has nothing in it. Click on the Add New Game button. Navigate to where your game folder is located.
Note that we are looking for the game’s executable file (.exe). In this case, there is ‘launcher.exe’ and ‘aces.exe.’ The actual game is started by ‘aces.exe.’ I found this out through trial and error.
Anyway, double click on the game executable file (.exe). This action puts the .exe in the Game List. Click on the name and it briefly flashes blue.
The game activates and is now ready to have SweetFX installed. Click the Add SweetFX button on the right-side. The middle now has a bunch of settings. You can turn each setting on/off via the checkbox beside the setting’s description. Some are already checked. They are active, so, don’t turn them off… at least for now. Underneath is where you can choose sub settings and change the values (numbers).
Scroll the various settings and click on the Vibrancy setting. Change 0.15 to 0.99 (more vibrancy, more bright color). Scroll through again and click on the check box for Split-Screen. The value for the split screen is one by default, which is one way of demonstrating what your game screen looks like with SweetFX ON/OFF.
In the bottom center, click on the Save Configuration button and the checkbox that says “automatically save configuration.” Now, you’re ready to close the Configurator via the red-x in the upper right corner and then start your game as you normally do.
Once your game starts you’ll notice a more vibrant brightness in the screen’s right side and the screen’s left-side will probably be somewhat dull. Not only did you increase the Vibrancy, but you activated the Split-Screen setting with the 1 value (vertical 50/50, SweetFX ON for the right-side and SweetFX OFF for the left-side).
Go back through and deactivate the Split-Screen setting… don’t forget to click on the Save Configuration button! This time, when in your game, you can use the END keyboard key to toggle SweetFX ON/OFF to compare the effects.
Presets (AW2 Mod):
In my customized version, I included some ‘presets.’ Presets are simply ready-made text files that store settings information. This file determines which settings to apply and not to apply.
Open the SweetFX Configurator folder and open another folder called SweetFX. Inside that is yet another SweetFX folder to open. Inside that you finally see a folder called Presets. Inside the Presets folder are some text (.txt) files labeled with various game titles… these are the actual ‘presets.’
Now that you know what presets are and where they are located, let’s go ahead and apply one.
- As before, open up the SweetFX Configurator folder.
- Find the executable file (SweetFX_config.exe).
- Right click and choose “run as administrator.”
The main program window opens. It is blank or has one game listed (aces.exe). Well, let’s add another game. This time, let’s apply SweetFX to the Advanced Warefare II Mod.
On the left-side, there’s the Game List, which has one game listed (aces.exe). Click on the Add New Game button. Navigate to where your Advanced Warfare II game folder is located. We are looking for the game’s executable file (JointOps.exe).
Note that the JointOps.exe location will depend upon how you installed the AW2 Mod. It might be inside the Advanced Warfare II folder or the Joint Operations Typhoon Rising folder or another related folder.
Anyway, click on the game executable file (.exe) and then click the Open button. This puts the .exe into the Game List. Click on the name and it briefly flashes blue. The game activates and is now ready to have SweetFX installed. Click the Add SweetFX button on the right-side. The middle now has a bunch of settings… ignore them.
Click the Load/Save Configuration button located on the right-side. A Presets window appears. Over near the left-side-bottom is a button called Import Presets… click it.
A search window opens. It should be opened to your game folder location (the one where JointOps.exe resides). Look for and open a folder titled SweetFX. Inside you will see the various presets available. Click on the one titled AdvancedWarfare2_99Viberant_M5 and then click the Open button.
AdvancedWarfare2_99Viberant_M5 appears on the Presets window. Now close the Presets window via the red-x in the upper right-side. The Configurator window reappears and you have to click the Load/Save Configuration button located on the right-side again… why the repeat action? -- it’s a bug or some sort.
So, once again, the Presets window appears, but previously, the center area was blank. This time, it has some setting text. Click the Load Preset button and close the Presets window via the red-x in the upper right-side.
The Configurator window fully appears. In the bottom center, click on the Save Configuration button and the checkbox that says “automatically save configuration.” Now, you’re ready to close the Configurator window via the red-x in the upper right corner and then start your game as you normally do.
Presets (LOTRO):
In my customized version, I included some ‘presets.’ Presets are simply text ready files that store settings information. This file determines which settings to apply and not to apply.
Open the SweetFX Configurator folder and open another folder called SweetFX. Inside that is yet another SweetFX folder to open. Inside that you finally see a folder called Presets. Inside the Presets folder are some text (.txt) files labeled with various game titles… these are the actual ‘presets.’
Now that you know what presets are and where they are located, let’s go ahead and apply one.
- As before, open up the SweetFX Configurator folder.
- Find the executable file (SweetFX_config.exe).
- Right click and choose “run as administrator.”
The main program window opens. It is blank or has one game listed. Well, let’s add another game. This time, let’s apply SweetFX to the Lord of the Rings Online (LOTRO).
On the left-side, there’s the Game List, which has one game listed (aces.exe). Click on the Add New Game button. Navigate to where your LOTRO game folder is located. We are looking for the game’s executable file (lotroclient.exe).
Note that the lotro.exe location will depend upon how you installed the game. My lotroclient.exe is located in C:\Program Files (x86)\Steam\SteamApps\common\Lord of the Rings Online…
Anyway, click on the game executable file (.exe) and then click the Open button. This puts the .exe into the Game List. Click on the name and it briefly flashes blue. The game activates and is now ready to have SweetFX installed. Click the Add SweetFX button on the right-side. The middle now has a bunch of settings… ignore them.
Click the Load/Save Configuration button located on the right-side. A Presets window appears. Over near the left-side-bottom is a button called Import Presets… click it.
A search window opens. It should be opened to your game folder location (the one where JointOps.exe resides). Look for and open a folder titled SweetFX. Inside you will see the various presets available. Click on the one titled LordOfTheRings_LOTRO_M5 and then click the Open button.
LordOfTheRings_LOTRO_M5 appears in the Presets window. Now close the Presets window via the red-x in the upper right-side. The Configurator window reappears and you have to click the Load/Save Configuration button located on the right-side again… why the repeat action? -- it’s a bug or some sort.
So, once again, the Presets window appears, but previously, the center area was blank. This time, it has some setting text. Click the Load Preset button and close the Presets window via the red-x in the upper right-side.
The Configurator window fully appears. In the bottom center, click on the Save Configuration button and the checkbox that says “automatically save configuration.” Now, you’re ready to close the Configurator window via the red-x in the upper right corner and then start your game as you normally do.
Obtaining and Applying New Presets:
Lately, I have been getting presets from the SweetFX Presets Database. There's a huge selection of games that have presets already created by very talented community members. I also get a lot of SweetFX information from a STEAM group called "SweetFX Junkies."
==> http://sfx.thelazy.net/games/
==> http://steamcommunity.com/groups/SweetFX
I had applied SweetFX 1.3, 1,4 and 1.5 to various games before SweetFX 1.5.1 existed. Now, I want to update a few games and one of them is Far Cry III.
At this point it is important to remember that whatever version of SweetFX (1.3, 1.4, 1.5, or
'Next'), they will all work with the current Configurator with the 1.5.1 files?" Well, here's why.
When I downloaded the preset and the version is "Next," which is most likely a new name for
SweetFX 1.5.1.
Download the preset for the game and just extract the "SweetFX_settings.txt" text file to the desktop and rename "SweetFX_settings.txt" to something meaningful. I renamed mine to "FarCry3_(VibrantFixed)_GSN_Omnipotus.txt."
Move "FarCry3_(VibrantFixed)_GSN_Omnipotus.txt" into the Presets folder... Open the SweetFX Configurator folder and open another folder called SweetFX. Inside that is yet another SweetFX folder to open. Inside that you finally see a folder called Presets.
Since the game previously had SweetFX applied and installed, it's a good idea to remove sweetFX, delete any SweetFX files from the game's folder and then reapply via the Configurator, which contains the new files.
Now that the new preset is in the correct location, it's time to apply it to the game.
- As before, open up the SweetFX Configurator folder.
- Find the executable file (SweetFX_config.exe).
- Right click and choose “run as administrator.”
The main program window opens. On the left-side, there’s the Game List. Select the game by clicking on the name. It briefly flashes blue.
Over on the right-side, click the Remove SweetFX button. The middle, where there were a bunch of settings, is now blank.
Go to the game's folder and if necessary, another folder that contains the game.exe. The game that I am using is an example... C:\Program Files (x86)\Steam\SteamApps\common\Far Cry 3\bin. Inside that folder find and delete the following:
SweetFX (a folder)
injector.ini
SweetFX.settings.txt
SweetFX.settingf.orig
Ready to reapply SweetFX via the Configurator? Follow the directions earlier in this article for applying SweetFX presets.
More Examples (Videos) ==> https://www.youtube.com/user/akmark5000/
Last edited by AKMARK5000 on Mon Mar 14, 2016 8:06 pm; edited 92 times in total (Reason for editing : Updated Information)

AKMARK5000- Posts : 216
Join date : 2010-04-01
Age : 51
Location : Central NYS -

Alternate Enable Process for SweetFX
![]() AKMARK5000 Sat Mar 14, 2015 11:28 am
AKMARK5000 Sat Mar 14, 2015 11:28 am
UPDATE 2016 !!
I have been enabling SweetFX via Radeon Pro software for a solid year. The software is free, works for many games and is compatible with RADEON, AMD and NVIDEA graphics cards.
==> http://www.radeonpro.info/download/
I don't have a tutorial of my own posted for this alternate non-configurator method of applying SweetFX. There is already one and, yes, this is the one that I used...
==> http://gamebanana.com/tuts/11582
It is a bit confusing at first. Remember, this works for many different games, but there are a few stubborn games that might not work at all. I think it's worth it to get SweetFX enabled through any method. I'll definitely be glad to help out anyone interested.
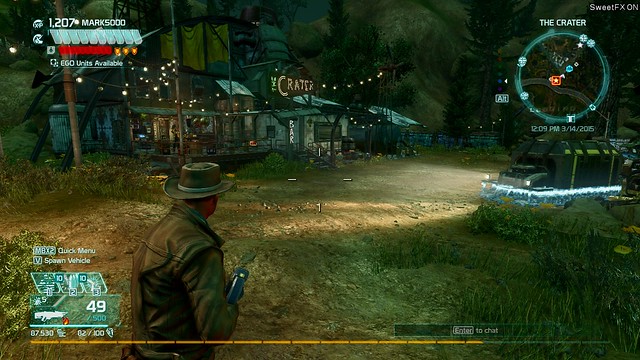
Understand that while split screen option is available, it does not display correctly for some games. So for consistency, I'm no longer using that particular feature in my screenshots and videos.
Comparison Examples: in the upper right-hand corner you'll see the words SWEETFX-ON or SWEETFX-OFF. The words are a bit difficult to see, so I typed them again for clarity (top side of the picture, left).
SWEETFX-OFF

SWEETFX-ON

SWEETFX-OFF

SWEETFX-ON
I have been enabling SweetFX via Radeon Pro software for a solid year. The software is free, works for many games and is compatible with RADEON, AMD and NVIDEA graphics cards.
==> http://www.radeonpro.info/download/
I don't have a tutorial of my own posted for this alternate non-configurator method of applying SweetFX. There is already one and, yes, this is the one that I used...
==> http://gamebanana.com/tuts/11582
It is a bit confusing at first. Remember, this works for many different games, but there are a few stubborn games that might not work at all. I think it's worth it to get SweetFX enabled through any method. I'll definitely be glad to help out anyone interested.
Understand that while split screen option is available, it does not display correctly for some games. So for consistency, I'm no longer using that particular feature in my screenshots and videos.
Comparison Examples: in the upper right-hand corner you'll see the words SWEETFX-ON or SWEETFX-OFF. The words are a bit difficult to see, so I typed them again for clarity (top side of the picture, left).
SWEETFX-OFF
SWEETFX-ON
SWEETFX-OFF
SWEETFX-ON
Last edited by AKMARK5000 on Mon Mar 14, 2016 9:56 pm; edited 14 times in total (Reason for editing : Update Information)
AKMARK5000- Posts : 216
Join date : 2010-04-01
Age : 51
Location : Central NYS -

 Similar topics
» Experiences in: Half Life 2 Revisited and Modified
» GAME LISTING!
» Game Purchasing
» Game Reorders and USB Headsets
» Game Requirments Before Purchase
» GAME LISTING!
» Game Purchasing
» Game Reorders and USB Headsets
» Game Requirments Before Purchase
Page 1 of 1
Permissions in this forum:
You cannot reply to topics in this forum|
|
|